Showing posts with label digital collage tutorial. Show all posts

Thursday, July 23, 2015

Layloni


she wears flowers in her hair…..

i'm taking Gillian Lee Smiths Unearth Gather Create class
in hopes of improving my drawing/painting skills. one of my
first assignments was face mapping and shading. this is my
first attempt:


as far as face mapping.. the proportions aren't correct..
although with faces really anything goes. i opened my
drawing in iColorama and changed it in Style to
Threshold to get this:


i took this to PS CS5 and used the select tool on the
black…saving it as a png (i also made a brush to use
in CS5). this allowed me to use the drawing without
including the white background.

next i opened this image of a Klimt painting in Repix:


 i used the Van Gogh brush to blur
sections of the photo ending up with this:


then on to Procreate where i added the
png of my drawing:


i cropped out the section with the face and
painted in the flower..white high lighting and
the design in the lower right corner. 

next i took it to iColorama and added the lettering
in the lower left corner and the paint drips.

i then opened it in Analog…adding the white dust
and scratches…to get the finished piece.

Tuesday, September 2, 2014

Red On My Mind a Digital Collage Tutorial


Geri Centonze over at Art of Mob issued a challenge
on instagram to create a face collage using parts from
different photos. this is one of my favorite things to do
so i created Red On My Mind. i thought i'd walk you 
through my creative process to show how i made this piece.

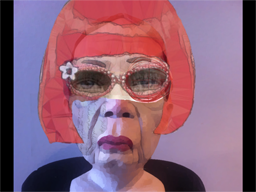
i began with a picture taken with my iPhone at a ceramics
exhibit.


i opened this in iColorama app and changed it
to a painterly look.


opened this in Procreate app and then opened
my color outside the lines collage as another
layer and erased everything except the eyes.


below is what i ended up with. i also brought in a layer
with a letter written in a childs handwriting and erased
it all except what you see on the cheek.


then i opened the above image in ImageBlender as
the background and opened the picture i did below
as the foreground.


i played around with the opacity modes and
slider and then masked out all but the hair and glasses.


i took this photo back to iColorama and again
applied a painterly look. next i wanted a better
background so i opened my Tintype collage
in ImageBlender as the background and then 
brought in the above image that i had painted.


i moved the woman off center and then masked
out all but her figure. next i took the combined
photo back to iColorama and used brush/paint
to do a wash of color over the numbers to
make them fit my colors. i wasn't too happy
with top of her nose so i took the picture back
to ImageBlender and brought in the original
painted ceramic picture on top and masked
all but the nose to cover that light patch under
her glasses. i like how it turned out. i'd also
like to say that i'm sure all these steps could
have been done in iColorama…i'm just not
that good with the app…it's a powerful app and
one that i would suggest you add to your
collection.